
Guide
Using StuFly
How to install StuFly, and how the watch app and the phone app work, screen by screen.
Before you start
Make sure your watch is paired with your phone and working properly before you install StuFly. It should already be receiving notifications from your phone, and other apps should be able to pass data between the two.
Wear OS can be finicky on some phones, especially with a new watch. Try a few other apps that use the watch first, such as Google Maps or WhatsApp. Only install StuFly once you're sure the watch and phone are talking to each other.
Installing the apps
- Keep your watch next to your phone and connected.
- On your phone, open the Play Store, search for StuFly and tap Install. This installs the phone app first.
- The watch app usually installs by itself straight afterwards. This can take a few minutes.
If StuFly hasn't appeared on your watch after about 5 minutes, install it from the watch: open the Play Store on the watch, search for StuFly and tap Install. You'll need to do this anyway if your watch is set not to install watch apps automatically.
Apple Watch: Install StuFly on your iPhone from the App Store. The watch app installs by itself if Automatic App Install is on in the iPhone's Watch app; otherwise, open the Watch app, find StuFly under Available Apps and tap Install.
First run
- Open StuFly on your watch and allow its permissions. It asks for each one in turn; see Permissions below for what each is for.
- Start your free trial. Next, the watch shows StuFly's subscription screen with a monthly and a yearly plan, each starting with a 30-day free trial. Tap the plan you want and confirm in Google Play on the watch. You won't be charged until the 30 days are up, and you can cancel at any time before then. StuFly then opens and starts recording.
The first time, the watch needs an internet connection (through your phone or Wi-Fi) to show the plans and confirm your subscription. After that StuFly keeps working offline for at least 7 days at a time. Already subscribed, for example after reinstalling or on a new watch? Tap Restore / re-check instead of buying again. If you've had a StuFly subscription before, the plans show the price without a trial. Exit closes StuFly without subscribing.
Apple Watch: The same subscription screen appears on the watch: subscribe through the App Store, or tap Restore purchases if you already have a subscription. You can also subscribe in the StuFly app on your iPhone; the watch picks it up from there.
- Choose your settings, such as units, either on the watch (press and hold the flight screen) or on the phone (Watch on the home screen). See watch settings.
- Do a test flight. Let StuFly run for 5 minutes or so: walk round your garden or the local park. Then exit StuFly on the watch to end the flight.
- Check it reached the phone. A notification about the new flight should appear on both the watch and the phone. Open StuFly on the phone, go to Flights and select the new flight to see its track on the map.
That's it: StuFly is installed and working.
If the flight doesn't arrive, check the watch lights on the phone's home screen.
Permissions
Allow each permission when StuFly asks. Only location is essential; if you turn down the others StuFly still records your flights, but you lose what that permission is for. You can change them later in the watch's or phone's Settings → Apps → StuFly → Permissions.
On the watch:
- Location (choose While using the app, with Precise on): GPS for your track, speed, altitude, map and wind. StuFly can't record without it.
- Physical activity: lets the watch run your flight as a paragliding exercise, with the watch's own exercise tracking.
- Notifications: shows that a flight is in progress, on the watch face and in the notification list, and tells you when a flight has been saved.
On the phone:
- Notifications: tells you when a new flight arrives from the watch.
- Location (asked the first time you open Waypoints): centres the map on where you are. Not needed for anything else.
Apple Watch: The watch asks for Location (your flight track), Health (each flight is saved as a workout, which keeps recording going when your wrist is down), Motion & Fitness (the barometer, for altitude and the variometer) and Notifications (reminders when a flight is still running). The iPhone asks for Notifications, for new flights.
Home
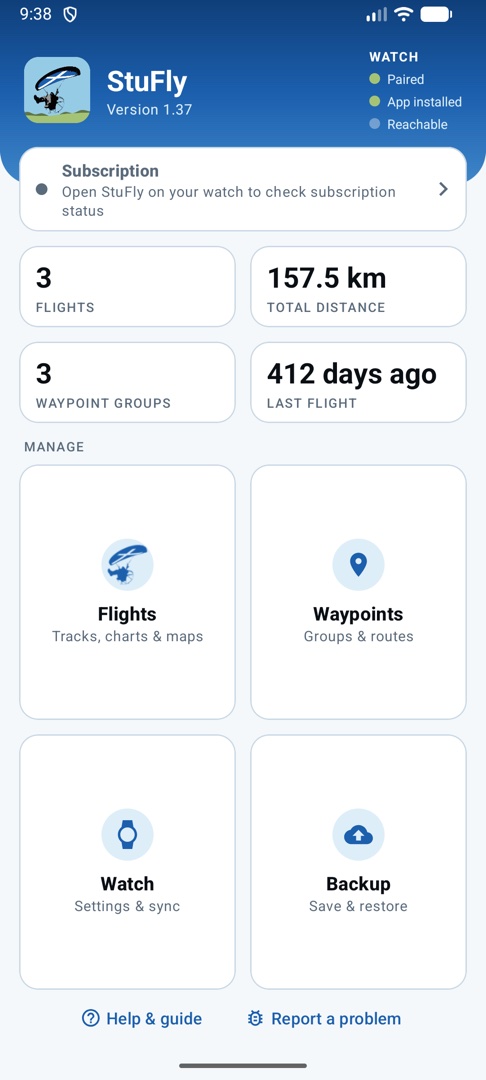
The home screen gives you a summary at a glance: your subscription status, how many flights you've logged, the total distance flown, how many waypoint groups you have, and how long it's been since your last flight.
Below that are the four parts of the app:
- Flights: view, replay and share your flights
- Waypoints: create and edit groups of waypoints
- Watch: view and change the watch app settings
- Backup: save and restore all your data
Help & guide at the bottom opens this page, and Report a problem sends a report to us (see Getting help).
The Watch lights at the top right show the link to your watch. Each light is green when that's true, and grey when it isn't:
- Paired: a watch is paired with this phone. It stays green when the watch is switched off or out of range.
- App installed: StuFly is installed on that watch.
- Reachable: the watch is connected and the StuFly app on it can be reached right now, so flights, waypoints and settings can sync.
If flights aren't arriving from the watch, work down the list: the first grey light is where the problem is. Pair the watch in the Wear OS / Pixel Watch app, install StuFly on the watch from the Play Store, or bring the watch close and make sure it's on and connected. In the screenshot the watch is paired and has StuFly installed, but isn't in range.
iPhone: The home screen is a list: Flights, Waypoints, Watch Settings, Backup & Restore and Help (which opens this page). Below it, under Apple Watch, are the same three checks (Paired, Watch app installed, Reachable), shown as a green tick when true, plus which build the watch app is running. Pair the watch in the iPhone's Watch app.
Tap the subscription row to manage your subscription in Google Play. The subscription itself is bought and checked on the watch; the phone app works whatever its status.
Flights
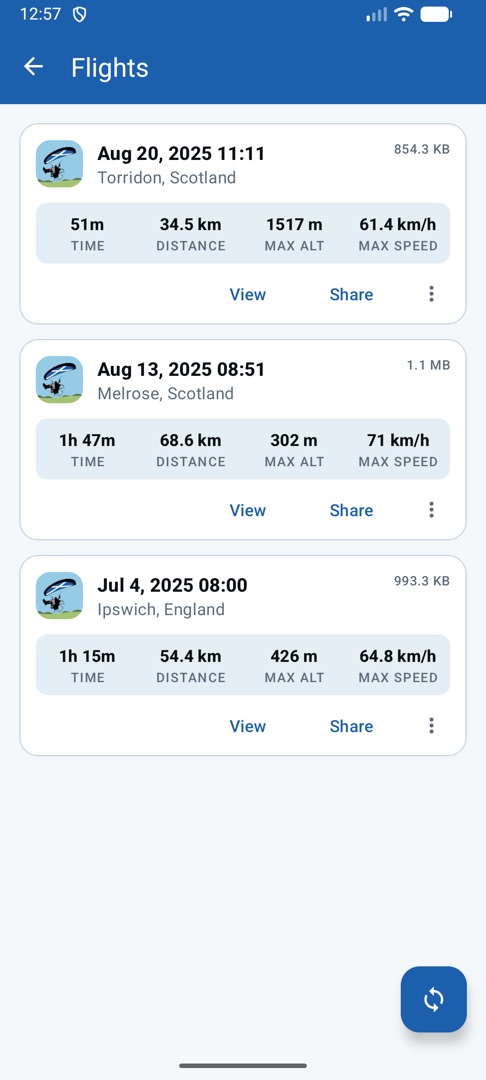
This screen lists all your flights with summary information. A flight is any time the watch app has been started and then exited, so you may want to use the ⋮ menu on a flight to delete any that weren't real flights.
Pull down on the list, or tap the sync button, to ask the watch to send any flights the phone doesn't have yet.
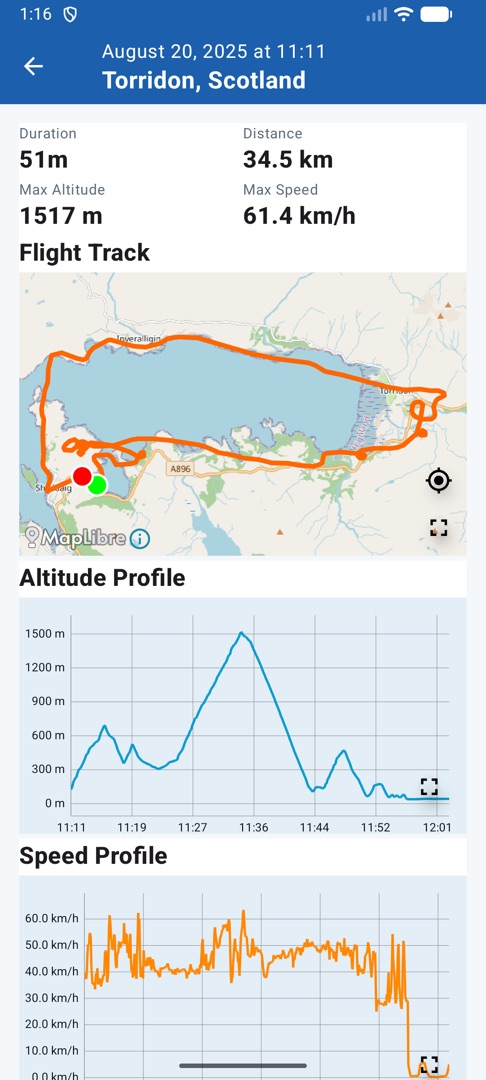
Selecting a flight opens its details. At the top is a summary of the key statistics. Below that is a map of your flight track, then an altitude profile and a speed profile. Each can be expanded to full screen, and you can turn your phone sideways to see more.
In the map you can pinch to zoom, rotate with two fingers and drag to move around, as in any map app.
Tap a point on your track and a marker appears there, and on the altitude and speed graphs too. You can also tap a point on either graph and all three views jump to it. This makes it easy to see where you were at your highest altitude or top speed.
At the bottom of the screen you can export the flight's GPX file to your Downloads folder, or share it straight to another app: most map apps can show GPX files, or send it by email or WhatsApp.
If something went wrong on a flight, choose Report a problem with this flight from its ⋮ menu (iPhone: on the flight's details). See Getting help.
iPhone: Export saves the GPX file to the Files app.
Waypoints
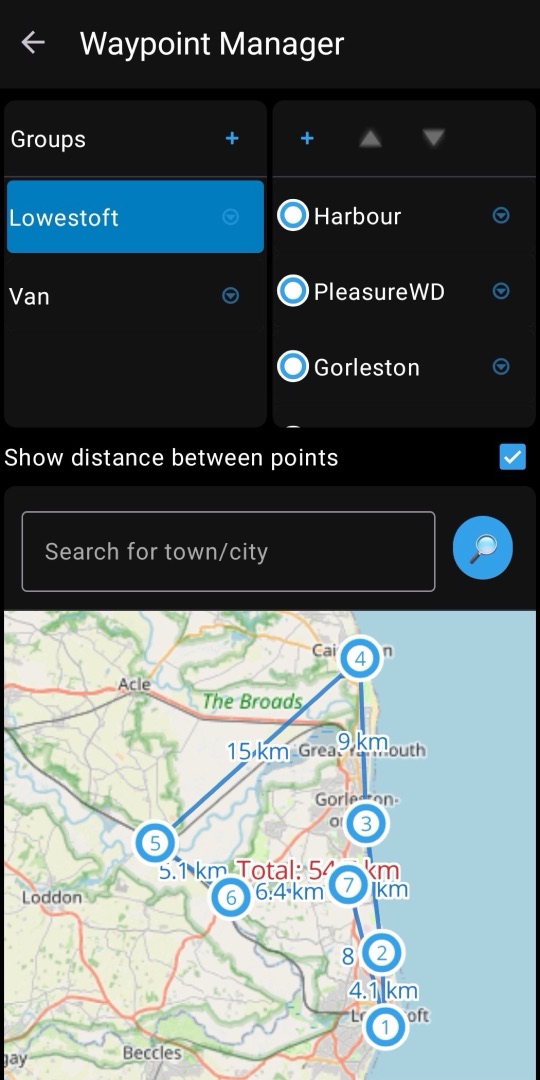
Groups are listed at the top left, with a + to add a new one. To rename or delete a group, select it and use the menu to the right of its name. Group names can be up to 10 characters.
With a group selected you can add waypoints. The easiest way is straight from the map:
- Use the search box to find a place, then move and zoom the map with your fingers. Zoom in to be as precise as you can.
- Press and hold on the spot you want. The Add Waypoint dialog opens with the coordinates already filled in.
- Give the waypoint a name (up to 10 characters). It appears in the waypoint list on the right for that group.
Waypoints are numbered automatically by their position in the list. Add a second waypoint and it appears on the map as a 2 in a circle.
Now select that waypoint in the list and use the up and down arrows to move it to the top. Both waypoints change number: their names stay the same, but their order has changed. The order is your planned route through the waypoints. It matters on the watch, which moves through them in number order, automatically or by hand.
Tick Show distance between points above the map to draw your route. You'll see the distance between each pair of waypoints and the total planned distance, so you can try different orders until you have a route you like.
Tap the sync icon at the top right, or leave the screen, to send your changes to the watch.
iPhone: Switch between the group list and its waypoints at the top. Add a waypoint with the Add waypoint button (at the crosshair in the middle of the map) or by pressing and holding the map; the route lines are under Map options. The phone also re-sends your waypoints by itself if the watch's copy is missing, for example after reinstalling the watch app.
Watch settings
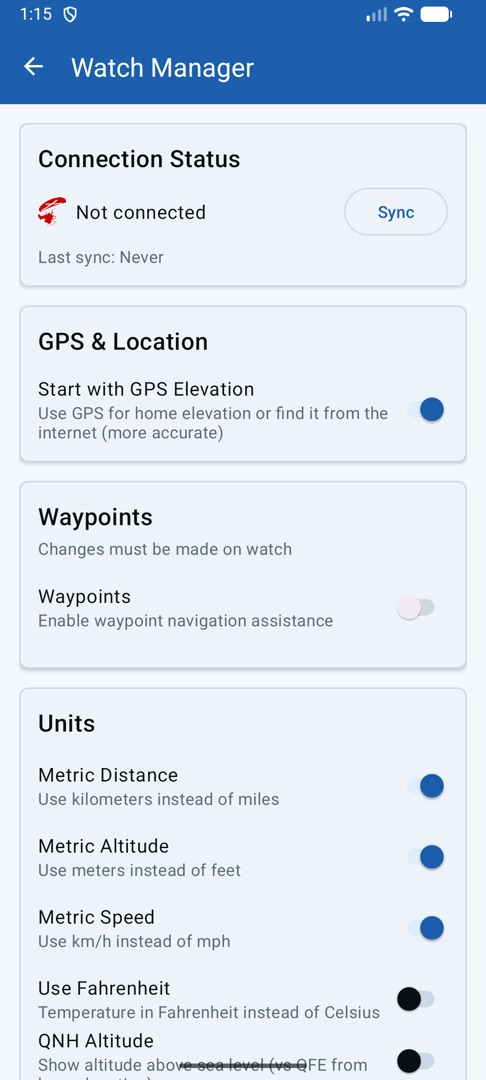
Many of the watch app's settings are shown here. It's an easy way to check them all without scrolling through them on the watch, and you can change them here too. Setting up your preferred units, map view and so on is often quicker from the phone.
The connection card shows whether the watch is connected and when it last synced. Tap Sync to sync now.
See watch settings for what each setting does.
Backup & restore
Backup saves all your flights (including their GPX tracks and logs), waypoint groups and waypoints into a single zip file in your Downloads folder, named with the date and time. Keep a copy somewhere safe, for example cloud storage, especially before changing phones.
Restore reads a backup file and replaces the data on the phone with it. You'll be warned before anything is replaced.
Settings and subscription status aren't included; they come from the watch when it next syncs.
iPhone: Backups are saved wherever you choose in the Files app. A backup made on Android can be restored on an iPhone.
Basics
Recording starts on its own
StuFly starts recording as soon as it gets a GPS lock, and keeps recording until you exit the app. This is by design, so make sure you exit when you've finished your flight. Otherwise StuFly keeps running in the background and uses battery. Double-tap the screen (or press back) to exit; your flight is then saved and sent to the phone.
Apple Watch: End the flight with End Flight on the last screen, or in Settings. If a flight is still running after 90 minutes you'll get a reminder, then another every 30 minutes. Each flight is also saved in the Health app as a workout. You can add StuFly to your watch face as a complication to start a flight with one tap.
Moving between screens
Swipe up or down to move between the screens: Flight → Map → Wind → Cloud → Vario (if switched on) and back round.
Apple Watch: You can also turn the Digital Crown. The last screen is End Flight rather than back round to Flight.
A swipe down from the very top edge of the watch opens the watch's own quick settings. Start your swipe a little below the top edge, or swipe from the bottom up.
Flight data
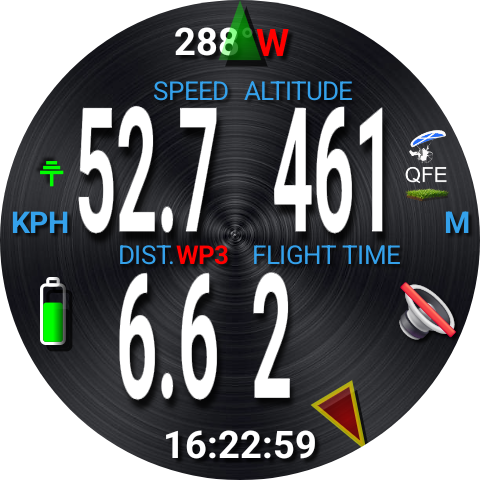
This is the screen you'll probably use most. It packs a lot into a small space, but once you know where each item is you'll soon get used to it.
- Top: your heading in degrees, with the nearest compass point beside it (for example 350 N).
- Middle: speed and altitude.
- Below that: two readouts. On the left is the distance to home, or to your next waypoint (shown as WP1, WP2…) if a waypoint group is selected. On the right is your flight time.
- Bottom: the current time.
Around the edge:
- Battery (left): turns orange below 30% and red below 10%.
- Antenna (above the battery): green when the watch has internet access, which maps and weather need; red when it doesn't. StuFly still works without it, just without maps or weather.
- QFE/QNH (right): grass underneath means altitude above your take-off point (QFE); sea underneath means altitude above sea level (QNH). This only changes the display: flights are always recorded as height above sea level.
- Speaker (right): whether vario sound is on.
- Pointer (edge): the direction to home or your selected waypoint.
Apple Watch: The time is at the top right, and the antenna, QFE/QNH and speaker icons sit along the bottom.
Settings
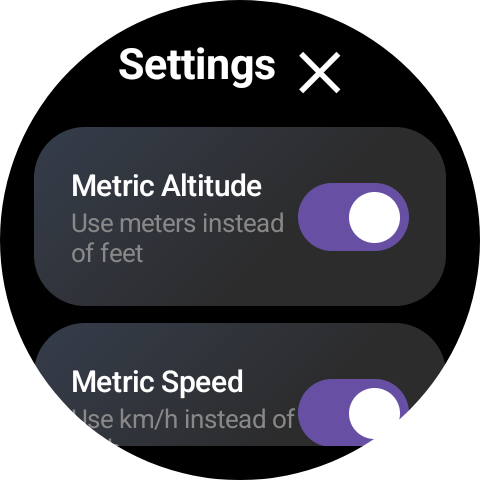
Long-press the flight screen to open Settings. Here you can configure many of the app's functions and how it shows information. Most settings can also be changed from the phone app.
Apple Watch: Long-press the Flight, Map, Wind or Cloud screen. After a demo mode change, Settings can only be closed by restarting the flight.
- Demo mode
- Choose one of three recorded flights and a playback speed. The app restarts and replays that flight as if you were flying it. It's a good way to learn the screens on the ground. Tip: set up a waypoint group along the demo flight's path to see how waypoint auto-advance works.
- QNH altitude
- On: altitude above sea level (QNH). Off: altitude above your take-off point (QFE).
- Metric distance
- On: metres and kilometres. Off: feet and miles.
- Metric altitude
- On: metres. Off: feet.
- Metric speed
- On: km/h. Off: mph.
- Use Fahrenheit
- Show temperatures in °F instead of °C.
- Heading-up map
- On: the map turns so your heading is always up. Off: north is always up.
- Show compass cardinals
- Show or hide N, E, S and W on the map.
- Dark map
- Use a dark map style, which also saves battery.
- Vario screen
- Show or hide the vario screen. When it's on, you can also turn vario sound on or off.
- Waypoints
- Turn waypoint navigation on or off. Only shown once you've created waypoint groups in the phone app.
- Waypoint group
- Tap to choose which of your groups to fly, or none.
- Auto-advance
- Move on to the next waypoint automatically once you're within the arrival radius of the current one.
- Radius
- How close you need to get before a waypoint counts as reached. Choose from three distances.
Map
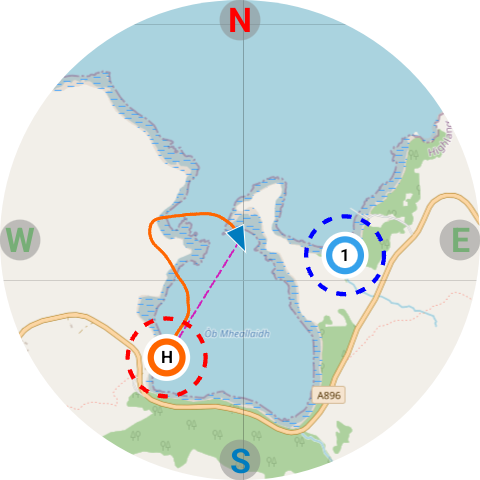
A moving map with an arrow in the middle showing where you are. Tap the screen to cycle through the zoom levels. Your track is drawn in orange as you fly, and a dashed line points to your selected waypoint, or home if none is selected. If a waypoint group is selected, its waypoints are shown on the map too.
To choose a waypoint: press and hold the map. The waypoints cycle slowly (H → 1 → 2 → 3…), each showing its name. Lift your finger when the one you want is showing. The dashed line now points to it, and the waypoint is also marked at the map's edge where the line leaves the screen. The flight screen updates to show distance and direction to it too.
The map can be north-up or heading-up, the compass points can be shown or hidden, and there's a dark style to save battery. All of these are in settings.
Apple Watch: The map uses Apple Maps. While the screen is dimmed it doesn't move; raise your wrist or tap it and it catches up with your position.
Wind
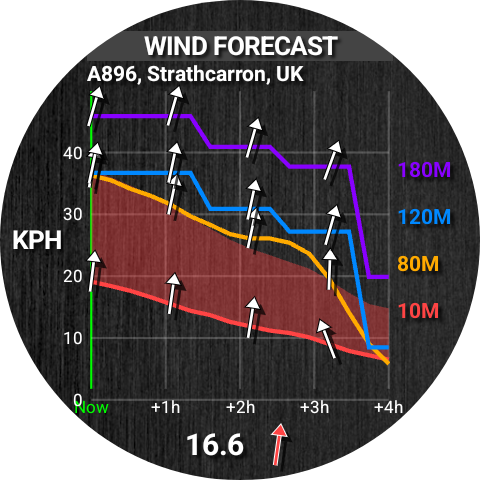
Forecast wind speed and direction at several heights, now and for the next four hours, kept up to date for where you are.
Each coloured line is one height (10 m, 80 m, 120 m and 180 m), with wind speed up the side. The arrows on each line show the wind direction. The red shaded area above the ground-level (red) line is the predicted gust range: a wide band means gusts could reach the top of it.
Compare the heights too: is the wind stronger higher up, or from a different direction?
The current forecast speed and direction are shown at the bottom.
In the example on the right, you can see that the 10m wind speed is around 20kph Northerly, but eases off to 6kph or so in 4 hours time. You can see that at 80M the wind is 35kph (quite a lot higher). The filled red area illustrates this wind gradient so you don't miss it before flying. You can see that at 180M the wind is over 45kph
Once you have viewed a few of these all-in-one wind graphs you'll be able to quickly interpret them with a glance.
These are forecasts, not measurements from the watch. Treat them as a guide alongside your own experience.
Cloud
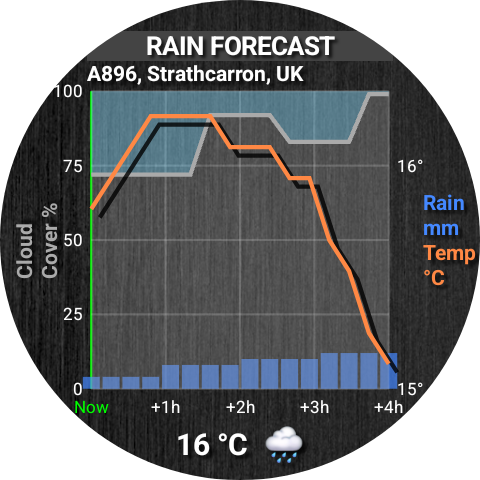
The forecast for the next four hours: low cloud cover as a percentage (grey for cloud, blue above it for clear sky), expected rain as blue bars, and temperature as an orange line.
The current temperature and a weather icon are shown at the bottom.
The example image on the right is showing around 75% cloud cover, building to 100% cloud cover in 4 hours time. The temperature is dropping a degree or so over the next 4 hours, and a small amount of rain is expected to be steadily falling over the same 4 hour period
Vario
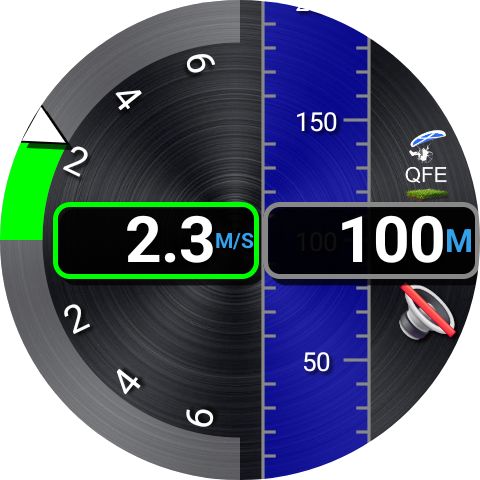
If switched on in settings, this screen is a variometer. On the left, a dial shows your climb or sink rate; on the right, a moving altitude tape. Together they show at a glance how fast you're climbing or sinking.
The speaker icon shows whether sound is on. Long-press the screen to turn it on or off, or change it in settings. With sound on, StuFly beeps like any other vario to tell you your climb or sink rate.
The vario is mostly a free-flight tool, so it can be turned off in settings. When it's off, the screen is skipped. The QFE/QNH icon on the right reminds you which altitude you're seeing.
Watches have their pressure sensor and air port in different places, and yours may sit in the airflow as you fly, which makes the readings noisy. If so, try covering the port with your sleeve or a piece of cloth.
Getting help
In the phone app, tap Report a problem on the home screen, or Report a problem with this flight from a flight. Describe what happened, pick the flight if it's about one, add your email address and tap Send report.
StuFly sends your description with the app's log, and the flight's track and watch log if you picked one, and shows you a reference number. We'll reply by email.
Please say what you were doing, what happened, what you expected, and whether it happens every time.
No internet at the time? Choose Email instead to send the same report from your email app, or write to contact@stufly.app.
Subscription
StuFly is a monthly or yearly subscription through Google Play, and starts with a 30-day free trial. You won't be charged until the trial ends. You can manage or cancel it at any time in Google Play subscriptions.
Safety
StuFly is an aid to situational awareness, not a certified flight instrument. Always fly within your training, check weather from official sources, and never rely on a single device.